Custom implant abutments are among the most technically demanding restorations we design. Unlike prefabricated titanium abutments, a custom CAD/CAM abutment must precisely account for the patient's unique soft-tissue architecture — and when done correctly, it creates a foundation for long-term peri-implant health that prefabricated components simply cannot match.
This article covers the two most clinically significant design parameters: emergence profile and screw channel angulation. If you understand these, you'll provide better case notes, approve designs faster, and achieve superior long-term outcomes.
What Is Emergence Profile in Implant Abutments?
The emergence profile is the three-dimensional contour of the abutment as it transitions from the implant platform to the gingival margin. It directly shapes the peri-implant soft tissue and determines how the crown will appear to emerge from the gingiva.
Three emergence profile types exist in custom abutment design:
- Straight (columnar) — minimal tissue compression, used for implants placed deep subgingivally or where tissue volume is limited
- Concave — the ideal profile for anterior esthetics; creates a natural-looking gingival architecture that remains stable over time
- Convex — used when tissue collapse is a concern; provides support to the peri-implant tissue but must be implemented gradually to avoid ischemia
Design principle: The transition from implant platform to gingival margin should follow a smooth, biologically appropriate curve. Abrupt contour changes create plaque-retentive areas and can cause tissue recession over time.
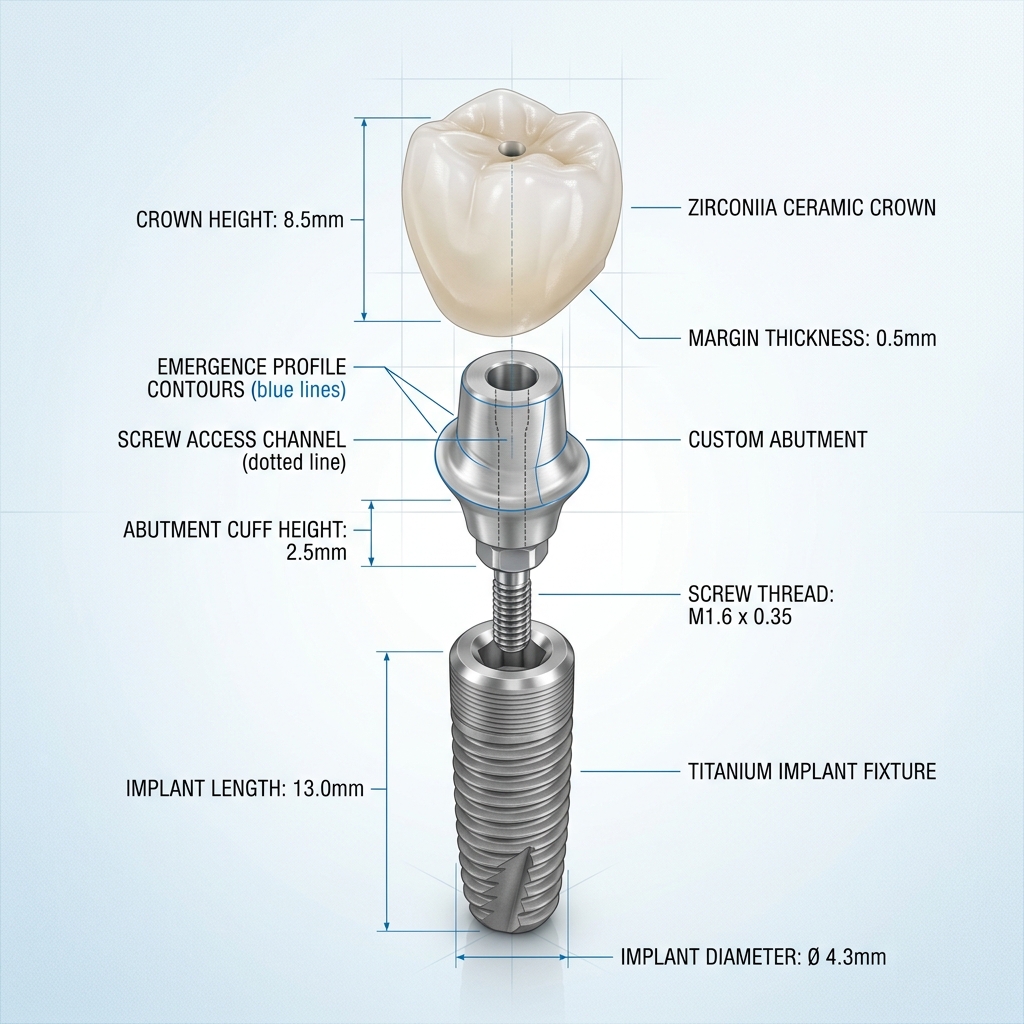
Custom titanium abutment showing concave emergence profile and centrally positioned screw channel
Clinical Parameters We Need From You
To design an optimal emergence profile, we need to understand the patient's tissue architecture. This information should come from your scan and case notes:
| Parameter | Why It Matters | How to Provide |
|---|---|---|
| Implant platform position | Determines subgingival depth of abutment start | Accurate scan body capture |
| Gingival margin position | Sets the coronal limit of the emergence zone | Include soft tissue in scan |
| Adjacent tooth contacts | Guides interproximal profile width | Opposing and adjacent scans |
| Tissue biotype | Thin biotype → more conservative profile | Note in case form |
| Restorative space | Determines supragingival height available | Measured VDO / bite registration |
Screw Channel Angulation: The Hidden Variable
Screw-retained restorations offer unmatched retrievability — but only if the screw channel exits through a functionally and esthetically acceptable position. For anterior implants, a labially emerging screw channel is a clinical failure. For posterior implants placed with excessive distal angulation, a screw channel that exits into the cusp can make torquing impossible.
Modern CAD software (and ancillary tools like Neodent's Digital Abutment Designer or DTX Studio) allows us to design abutments with screw channel correction of up to 30–35° from the implant axis. Beyond that, correction is not reliably achievable, and a cement-retained design must be considered.
- 0–15° correction — straightforward, no functional compromise
- 15–25° correction — achievable, verify final screw access position in case notes
- 25–35° correction — possible with certain library systems; verify compatibility
- >35° correction — cement-retained recommended; flag this before we design
Have a complex implant case?
Our implant specialist Daniel reviews each case before design begins. WhatsApp for a pre-case consult.
Our Abutment Design Workflow
- Library matching — identify the exact implant system and platform from the scan body reference provided
- Implant axis reconstruction — place the implant body in 3D space using the scan body geometry
- Emergence profile design — contour the subgingival portion of the abutment to the soft tissue anatomy from the scan
- Supragingival form — design the crown prep geometry with appropriate taper, finish line, and height
- Screw channel routing — apply channel correction, verify exit position relative to occlusal surface
- Crown or cap design — if included, designed separately over the abutment with proper contact and occlusion
Common Design Mistakes — And How to Avoid Them
- Over-convex emergence → tissue ischemia. We flag any profile that exceeds 30° convexity beyond the platform. If clinical tissue compression is required, we will notify you.
- Narrow interproximal profile → black triangle. When scan body data suggests significant implant-to-tooth distance, we design for optimal papilla support — but only if we know the tissue situation.
- Ignoring the screw access early. Designing the crown before confirming the screw exit often results in a screwhole through an unwanted surface. We always design abutment and crown together.
What to Provide for Custom Abutment Cases
- Scan body fully captured with soft tissue visible at gingival margin
- Implant system name, platform diameter, scan body reference (e.g., SB-RN-4.1)
- Adjacent and opposing arch scans
- Tissue biotype noted (thin / thick)
- Desired screw access position if specific (e.g., "cingulum area acceptable")
- Cement- or screw-retained preference
- Restorative material for the crown/cap component
- Photos of emergency profile if replacing existing temporary
Custom abutment design is one of the areas where communication between clinician and CAD designer has the greatest impact on outcomes. The more context you provide about the clinical situation, the better we can design a restoration that will serve your patient for years — not just pass the chair-side try-in.